
The BEST Gluten-Free Sourdough in the world
Plus, BONUS RECIPES!!!
IMPROVED RECIPE!!! (15/03/2019)
Much easier to digest and that much tastier.
IMPROVED RECIPE!!!!!!!!! (01/01/2020 and 14/07/2020)
Same, same, but different!
(see below for all the possible variations)
14/07/2020. The story of a perfectionist is never finished — and I believe, never told — because it goes on and on in the hope that finally perfection is achieved, although, perfection is a state rarely achieved, as a perfectionist is always seeing a glass half-empty and never half-full and so never quite satisfied. There are always exceptions to the rule, and I think the exception was proven this morning.
I used to LOVE bread (truly, an understatement!).
At age 30 I was told I was intolerant to gluten (but also to dairy, which explained the many years of extreme suffering and always being underweight and, to be honest, unhappy). After that, I still made bread at home (because I do love baking and making bread is a truly soothing exercise for me, a bit like meditation is for many people. I would have a slice here and there — well, someone had to eat it, right? — until I gave up completely.
Then, I created this sourdough recipe and it was an instant hit!
It tastes just like the real thing. But it is completely gluten-free, organic, and free from junk. None of which commercial bread makers are proud of, even the gluten-free kind, because it is so full of additives and preservatives, and quite disgusting, if I may say so myself.
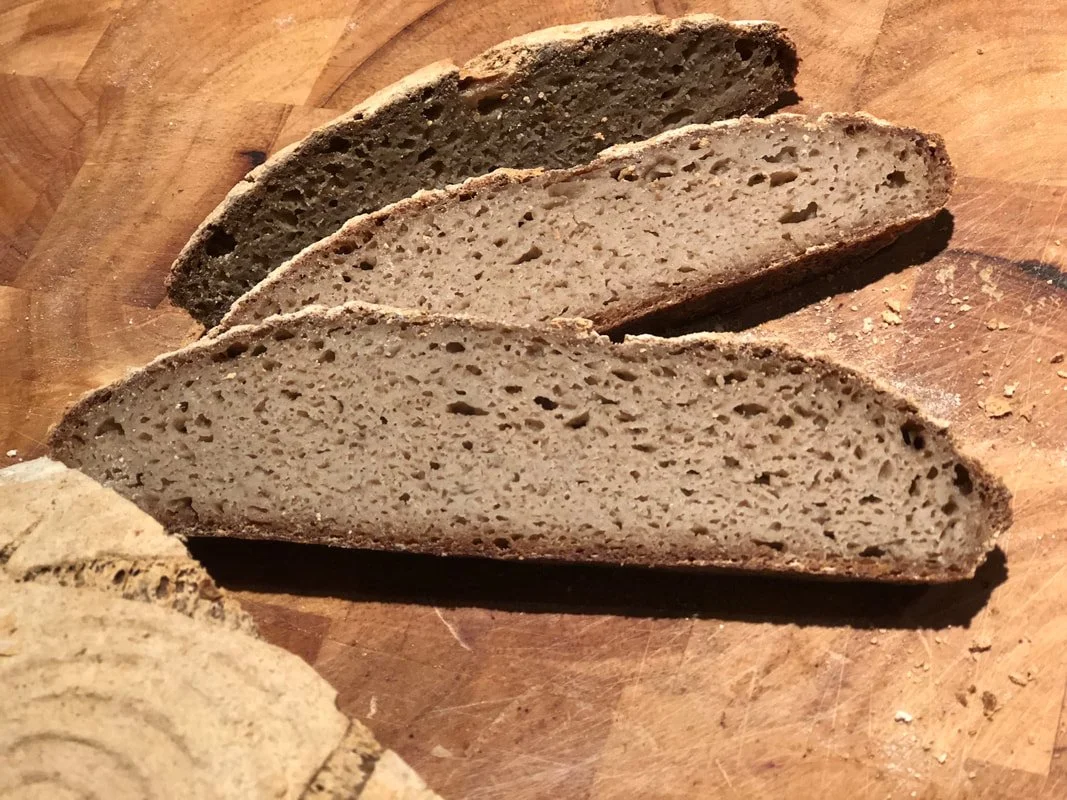
Yesterday, I wanted to apply the same techniques I used to make regular bread and see how it would change or make the recipe better. To my surprise, the loaf of bread today was like the real thing. It looked like the real thing — a regular sourdough. Crusty and yet bouncy in the middle. It held its shape once sliced. The tasting was also surprising because if I had not known it was gluten-free I would never have guessed.
So in this case, this is the exception to the rule. And, to be honest, I am extremely SATISFIED!
See the updated recipe and pictures at the bottom of this blog.
After reading the "Science of Cooking", I have always made bread with vinegar. That is because vinegar allows the bread ingredients to combine completely and make a very aerated and delicious bread. The added oil provides a more crusty bread and so, using these two simple ingredients made the recipe “perfect” indeed!
The Gluten-free lie!
The problem, nowadays, with all the gluten-free alternatives is that they are full of junk and in many more ways worse than gluten-containing products.
Usually, gluten-free bread is made with excessive amounts of vegetable/seed oil, salt and sugar; contains eggs, trans fat, additives and preservatives, and the end result is much closer to a cake than bread. So I have never been taken by shop-bought options and I have been experimenting for a very long time to get my gluten-free recipes right but also tasty and replicable. I also don’t trust so-called gluten-free options on some blogs or social media as soon as I see eggs and baking powder because these ingredients make a cake, not bread.
Processed gluten-free bread (the way I tend to call it) is mainly made using rice flour. This leads to the bread drying extremely quickly, crumbling away, and the texture is simply horrible.
Today, I would like to propose a truly original recipe, unlike any other, which will blow you away, I am sure.
It is not often that a first attempt brings amazing results. I consider it to be pure beginner's luck.
So, to make sure a recipe works, I double-checked it. And then, I made it again, and again.
Three times is a charm, right?
If I can replicate the same recipe three times or more and get the same result, then I am confident that you can easily make it at home too.
When I created this recipe, I thought it was too good to be true.
With the first bite, I thought I had been transported back to my childhood, tasting bread the way it should, flavourful and nutritious. It made me happy!
Although, I wish to blame my neurotransmitters and other happy brain chemicals for what followed:
I had devoured half a loaf for the sake of the experiment.
Tasting is extremely important.
I hope you agree.
I do..!
Sadly, I had no cheese or butter.
Although, this was just as well. The loaf would not have survived it...
[Now making the recipe again today, I am glad to say that I stopped at my favourite store on the way home yesterday, after a great seminar on nutrition, and bought some Organic grass-fed butter.
I cannot wait to relive more of my favourite childhood moments again.
For those who know me, I cannot tolerate biscuits and cakes, especially the store-bought options. As a kid, I would be extremely sick (in a matter of minutes) after eating a piece, or just a spoonful. My mum had to come up with alternatives, just for me. My brothers were too happy to have my after-school biscuits (and my French fries too, another food my body rejects).
My mother would give me instead a slice of her delicious homemade bread, spread a touch of butter on it — or sometimes, condensed milk — and a sprinkle of dark cocoa powder. Wow... how nostalgic I feel now writing this...]
What are the favourite homemade treats you had as a child?
Back to the recipe, I hope you will enjoy this homemade Gluten-free Vegan Sourdough.
I would like to point out that this recipe does not call for wasting large amounts of starter.
Usually, a recipe calls for an average of 100 g of starter, but you had to discard half of your starter with every feeding phase, leading to wasting a minimum of 1.2 kilos of edible food or more!
By no means do I wish to force you to follow my way if you feel your way is better, or if you feel more comfortable by only feeding half of the starter every time. If you wish to do so, I would like to advise you to not discard the extra starter.
You can use the half you are supposed to discard to make another starter. This is great! Once your starter is established. you can feed it until ready as per usual, and place it in the fridge until needed. This is great, especially if you are a large family or your bread just doesn't last long enough.
You can use the extra starter to make pancakes or waffles. They would be tastier and easier to digest too, as the grain is now fermented.
To give the heads up, you need to make sure you can attend to your starter every twelve hours also.
Missing one feeding can lead to bad bacteria or fungus developing instead, and your starter may die and give a horrible smell.
Please, post your comment below and let other readers know how you made your very own sourdough.
METHOD
PHASE 1:
Sourdough Starter:
100 g buckwheat flour
100 g water
Every 12 hours feed starter with:
Day 1 and Day 2:
100 g buckwheat flour
100 g water
Day 3:
100 g Casava (or Tiger Nut) flour
100 g water
Day 4:
100 g Brown Rice Flour
100 g Water
Day 5 and 6:
100 g Buckwheat Flour
100 g water
Day 7:
Use in recipe
TIP:
If you want to use high-containing starch flour such as millet, tapioca, white rice, or even potato, you will need to feed the starter much more often, ideally every 5--6 hours, as they make the yeast go into overdrive.
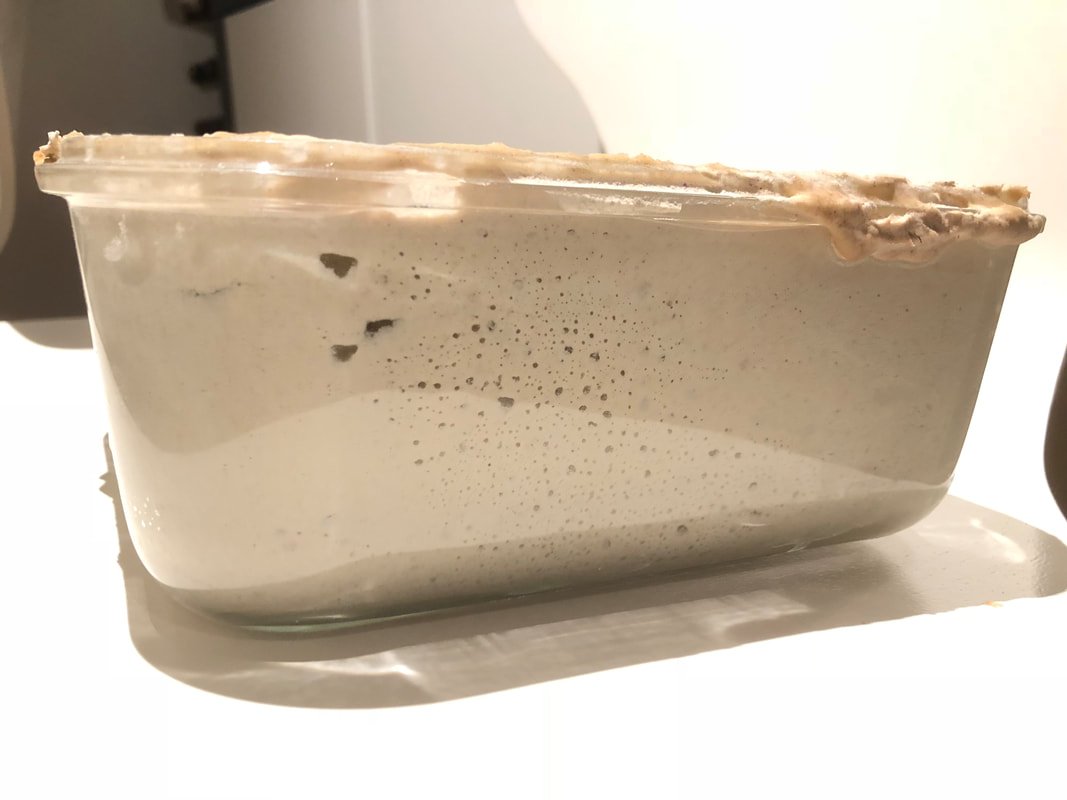
Bubbles, and a healthy starter (2-litre glass container)
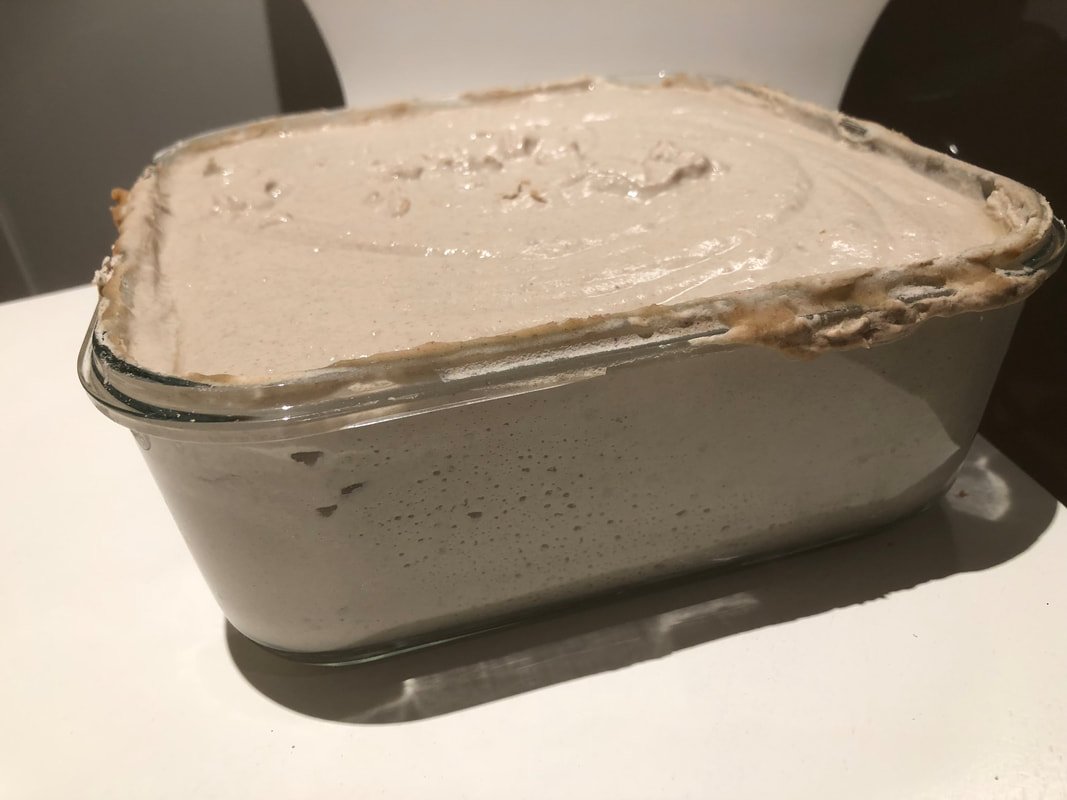
6th day. 2 litres full. Happy and Healthy.
Gluten-Free Rustic Sourdough & Sandwich Bread
Ingredients (1 large lof):
770 g Starter
550 ml water
30 g Psyllium Husks
300 g Buckwheat flour
155 g Gluten-Free Brown Bread flour
10 g Salt Flower (“fleur de sel”)
20 g sugar (optional)
Method:
When you are ready to use your starter, make sure this corresponds – more or less – to a feeding time.
Do not leave your starter unattended for more than 12 hours.
If you are using an ongoing starter (see in FAQs, how to store and look after your starter once it is established), you must take it out of your fridge, feed it (as above), and let it warm up gently at room temperature for a minimum of 12 hours (ideally 24 hours).
Cover the recipient and let the fermentation kickstart again.
Once the starter is active again or using your very first batch, measure out 770 grams and feed again the remaining starter. Refrigerate and feed regularly (every 5–7 days. Keep an eye on it). Depending on how strong you like your sourdough, you can use as little as 500 g or make your starter in only 5 days.
Tweak the recipe to match your taste.Place in your mixer bowl, set with the K-beater, 3/4 of the water and the starter.
Beat the starter on the lowest setting until gently dissolved.Place all the dry ingredients in a large kitchen bowl and stir well.
The last thing you want is for the phylum husks to land first and in contact with water create lumps.
Pour the mix into the mixer bowl and beat for about 20–30 seconds, until the dough comes together, and add the remaining water. Beat for another 2 minutes on medium-low speed, until a nice batter forms.
This is a gluten-free recipe so you do not have to worry about over-mixing. You know the dough is ready when you see the usual "strings" of dough forming (see video below).
Sprinkle freely your wicker basket with buckwheat flour or use a (very clean) cotton kitchen towel/oven cloth-lined kitchen bowl. You can also line a mould with parchment/greaseproof paper, lightly brushed with olive oil.
Scoop the dough in the recipient. Oil freely a sheet of plastic wrapper/cling film. Leave the bread dough proof gently in a warm and draft-free place for about 12 hours.
The dough should have doubled in volume (or near) after 12 hours and smell nicely active. Leave to proof for 24 hours for a nice sourdough flavour.
If you have used a wicker basket, line an oven tray with parchment/greaseproof paper and brush with olive oil.
Preheat oven to 200˚c.
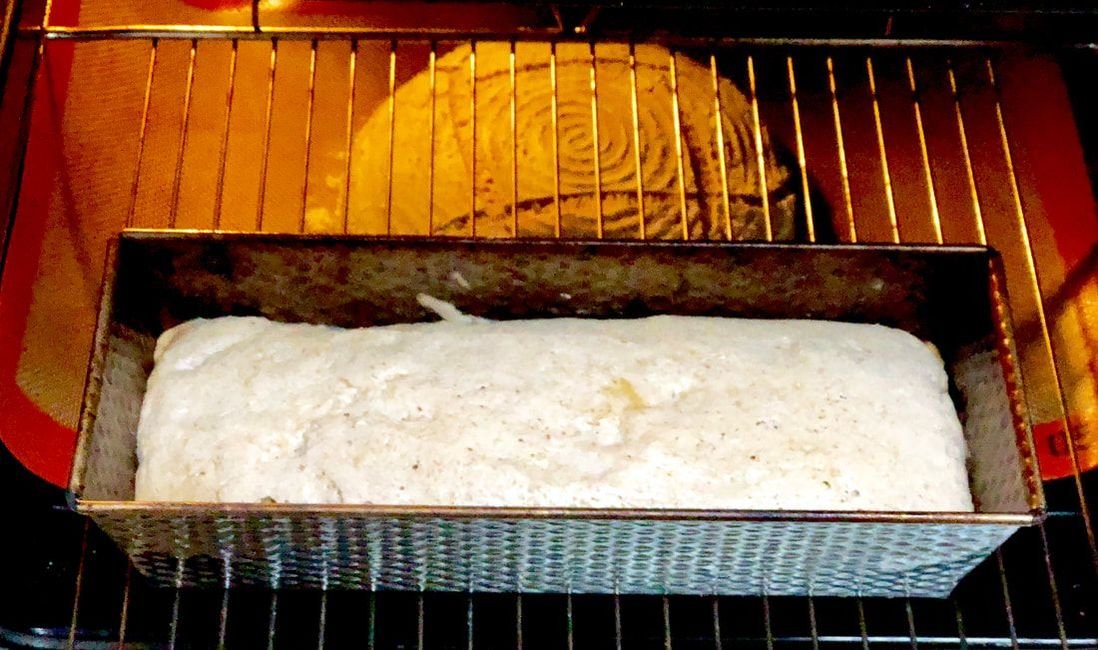
Gently tip the dough onto the tray and place in the middle of the oven. If you have used a mould/tin, gently place it as it is in the middle of the oven.
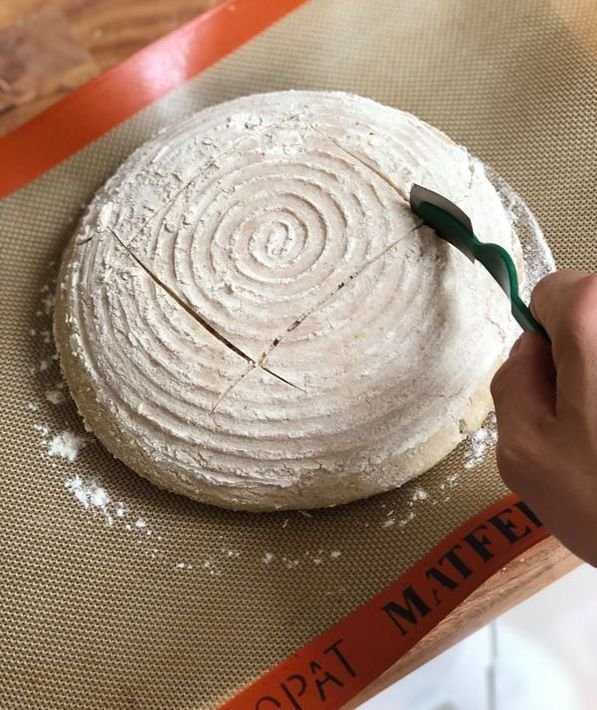
Use the edge of a very sharp knife to make incisions. This will allow for the dough to continue rising while baking.
After making incisions into the dough, you can let the dough rest for another 2 hours for a more pronounced flavour, before baking. Note that the dough will spread to take the shape of the containing as it continues to proof. This is normal as it contains no gluten. However, you can keep a nice round shape by using a cast iron pan or Dutch oven.
Bake for about 45 minutes. If using a tin/mould, remove the bread and turn it over after 35–40 minutes to expose the bottom to the heat and promote a nice crust, and bake for another 10–15 minutes.
Remove the bread from the oven and place on a cooling rack.
Leave to cool completely (about 20–30 minutes) before slicing.
You must resist!!!
Otherwise, the steam will escape far too quickly and the centre will quickly crumble and you may not keep your sourdough bread as long.
Store your sourdough in a bread box or inside a air-tight container with the lid loosely place on top.
You can keep your sourdough bread up to a week. You can also cut it in half, once cooled, and freeze one half.
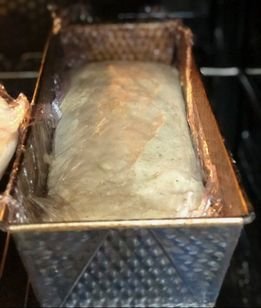
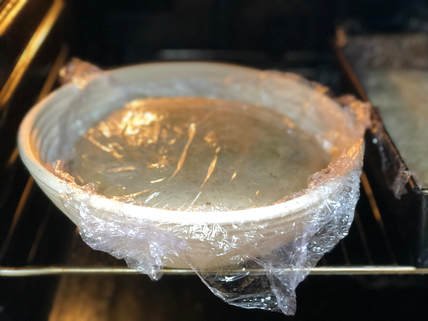

Please, note that for the sake of the picture, I used cling film. I typically use a linen proofing basket cover. I also use non-bleached parchment paper.
I had enough starter to make 2 sourdough loaves of 1 kg and 2 sandwich bread of 750 g each
And enough to save 750 g starter.
I also added 100 g buckwheat to the starter but no water this time and reserved it in the fridge until further use or feeding. A starter can be kept dormant in the fridge allowing that you are feeding it every 5–7 days (or 15 days if using less water) in an air-tight container or jar. You must not let it dry. If you notice a colour change, remove the top half of the starter and feed again. You may also add 1 tablespoon of kefir or kombucha to help the bacteria thrive again.
Be careful to not place the starter near the back of the fridge, especially if your fridge produces ice. Your starter will freeze and thaw continuously, which will damage it and/or kill it.
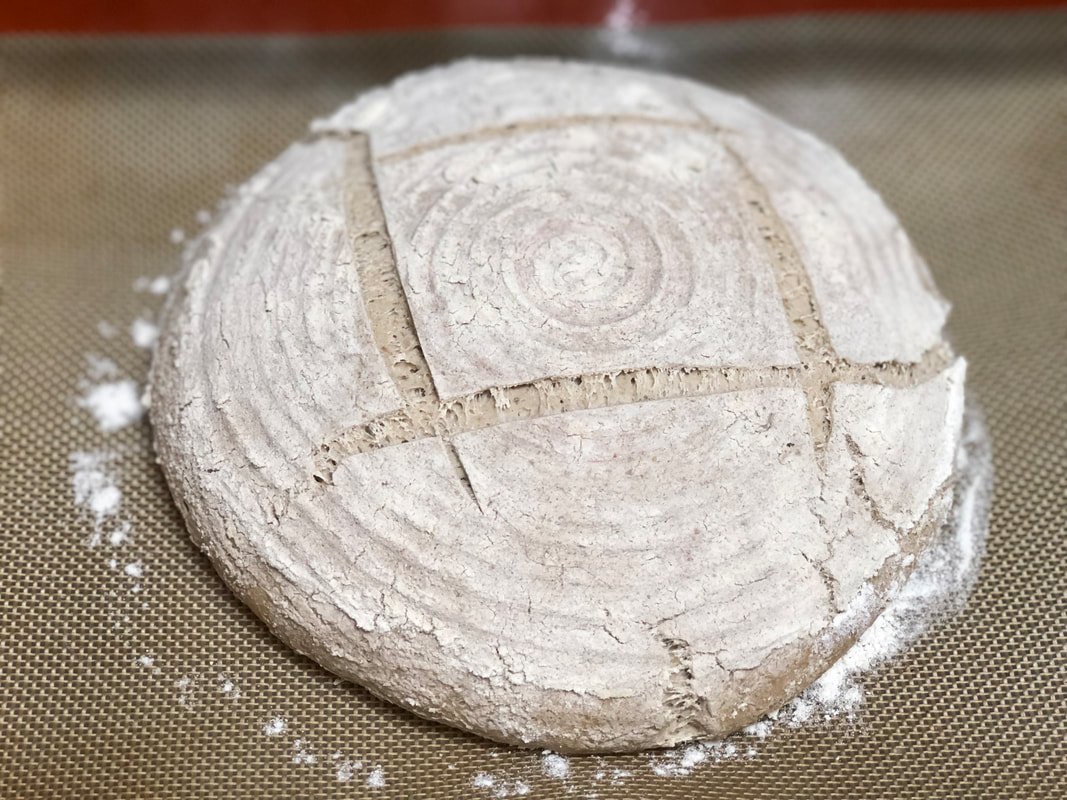
WOULD YOU BELIEVE THIS BREAD IS GLUTEN-FREE...
… IF I HAD not JUST TOLD YOU?
How to use your starter to make a second batch
When you have used what you needed from your starter, then it is time to feed it again. Add 100 grams of buckwheat flour and water.
If you plan to use the starter a few days later, you can leave the starter at room temperature and feed it every day to obtain another starter of 750g/1kg. Use as needed.
If you are not planning to use your starter for another week, then feed it with 100 grams of buckwheat flour and water. Store it in the fridge until the next feed or use. Remember to take it out of your fridge 12-24 hours before using it in your recipe.
Repeat the same process every time.
Gluten-Free Rustic Sourdough
To make 1 loaf of Rustic Sourdough, use the following ingredients and the same method as given above.
INGREDIENTS (1 kg loaf)
500 g Starter
355 ml water
20 g Psyllium Husks
200 g Buckwheat flour
100 g Gluten-Free Brown Bread flour
5 g Salt Flower (“fleur de sel”)
15 g sugar (optional)
I fed the starter once more time before refrigerating it again. This has given another 750 g total starter.
If you follow these steps, you should be able to make 1 loaf of 1 kg per week and end up with the same amount of starter each time. Create a great rotation system; however, if you make 1 loaf every 2 weeks, for example, you may end up with more starter after each recipe. To keep control of your starter, you can make an extra loaf a month and freeze it if necessary.
Gluten-Free Sourdough American-style Pancakes
It's not every day that you will find me advertising grains, but on special occasions, pancakes can make the perfect treat. So if you have too much starter growing in your fridge, if you want to discard half of your starter at each feeding, then you will have plenty of starter to spare and many great pancakes to make (or even waffles).
INGREDIENTS (6–8 pancakes)
350 g Starter
50 g Almond (or Coconut) Flour (optional)
1 ripened banana
1 egg
1 tbsp Baking Powder
1 tsp Coconut Oil
1/2 tsp Cinnamon
Method:
Using a fork, mash the ripe banana, which will naturally sweeten the batter (you may want to add a tablespoon of raw honey — if the banana is too green. You can also use a grated apple or diced pineapple), and mix in the cinnamon, baking powder and flour.
Add the eggs and mix well.
Add the starter and mix well. If the batter is too thick, add 1 tablespoon of water.
Place a skillet over medium-high heat and melt a little coconut oil. Pour the batter into small disks and once bubbles appear on the top, approximately after 2–3 minutes, flip each pancake. You may want to adjust the heat if necessary. After 2–3 minutes, once the bottom appears golden brown and the pancakes are cooked, place the pancakes on a plate.
Repeat until you have used all of the batter.Serve with berries and a touch of maple syrup.
Once cooled, you can also freeze them.
Gluten-Free Sourdough Waffles
Probably a lot easier to digest, once you have tried this recipe you will never go back to using white flour and milk. Plus, you should always have some starter to spare, if you are not making one loaf or two a week.
These are great because they are really tasty and much lighter.
Ingredients (12 or 24 smaller-size waffles)
Overnight Sponge:
450 ml Almond Milk
250 g Starter
250 g Buckwheat (or Gluten-free blend) Flour
2 tbsp Apple Cider Vinegar
1 tbsp raw cane (or coconut) sugar
Batter
3 eggs (or replacement, for a vegan recipe)
4 tbsp Coconut Oil (melted)
1 tsp Baking Soda
1/2 tsp Salt
Method:
1. To make the overnight sponge (aka. the active starter), place the almond milk in a kitchen bowl and add the vinegar. Once the liquid has curdled, after about 20 minutes, stir in all the remaining ingredients, including the starter (either from the first batch or from the refrigerated starter).
2. Cover the bowl with a humid clean kitchen towel and let it rest at room temperature overnight, ideally 12 hours.
3. In the morning, beat the eggs and the melted coconut oil, and add to the sponge.
4. Stir in the salt and baking soda. The mixture will bubble...
5. Preheat the waffle iron and cook until golden brown and crispy.
Serve immediately to preserve the crispiness or place in a warm oven to keep hot.
Gluten-Free Sourdough Boule
I particularly like this recipe because it reminds me of the old days. The days were baking and cooking were a complete part of our life, bringing family and people together.
To bake this delicious bread you will need a Dutch oven or an enamel stockpot/chicken roaster with a lid and a spray water bottle. If you have a probe, it will also come very handy, although, if you don't it is also fine.
Ingredients:
750 g Starter
175 g Buckwheat Flour
150 ml filtered water
100 g Brown Rice Flour
100 g Tapioca Flour
20 g Sugar
5 g Salt
Method:
Place the starter and the different flour in the bowl of your mixer, equipped with the paddle/k-beater.
Set the speed to low and mix for a few seconds, until combined, stiff and somewhat dry.
Pour the water gradually, a little at a time, until the dough resembles a cake batter.
Make sure to wait a few seconds after adding water each time, so that you can judge if more or less is needed. The batter should not be soupy or too stiff.Line the wicker basket with its cotton cloth, or if you do not have one, fully line up a kitchen bowl with greaseproof/parchment paper as neatly/smooth as possible to prevent too many large wrinkles.
Make sure that the parchment paper goes over the sides, you will need this to help you tip the dough into the Dutch oven.Scrape the dough into the lined bowl, and gently smooth the top.
Make a few incisions in the dough, to help it rise better.
The tapioca flour will help the dough rise nicely too.Cover the bowl with cling film or apply a oiled-sheet of cling film directly over the top of the dough.
Place the bowl or wicker basket in a warm and frat-free place, either the cupboard over your fridge or inside your oven. Keeping the oven light on only should suffice to bring some much-needed warmth. Leave the dough to rise for 12 hours. It should have doubled in size.
When ready to bake your bread, place your Dutch oven inside the oven and set the temperature to 220˚c. Take the oven Dutch out of the oven once hot, approximately after 30 minutes. Remove it carefully from the oven and place it on a heat-proof surface. Take the lid off. Be careful, it would be extremely hot.
Remove the cling film
This next step requires your complete attention and concentration. It is very easy to burn yourself or damage the dough.
Very gently and carefully, lift the dough, pulling on the parchment paper using the extra hanging over the sides. The dough is extremely fragile. Do not lift it too quick and do not release it quickly either, and make sure you have a firm hold of the parchment paper so that you do not loose the dough. Again, make sure not to burn yourself as you lower the dough inside the Dutch oven.
Cut the edges parchment paper, if necessary, so that you can close the lid, and spray with water. This will help create a crispy crust.
Place the hot lid back on the Dutch oven and place it inside the oven.
Bake for 45 minutes, then remove the lid carefully and continue baking for another 15 minutes.
Using a probe, the internal temperature of the boule should be around 100˚c.
Another tip to check if the bread is fully cooked, knock on the crust with your finger and it should sound hollow.
Leave to rest for 15 minutes then remove from the Dutch oven, peel off the parchment paper very carefully, and transfer on a cooling rack.
Let the bread cool completely before slicing it.To store, simply keep on your kitchen counter, cut side-down (so the crust can continue to stay crunchy and the inside moist and soft). If you insist on covering it, you can use a paper bag or a linen bag. I would recommend not to wrap it in cling film or place it in a bread box with the lid on, as it is will soften the crust.